When I bottled my first batch of homemade wine, I didn’t really know what I was doing — I’d read a few forum posts, borrowed a hydrometer from a friend, and hoped for the best. It came out drinkable, but barely. The batches that followed got better once I understood why each step mattered, not just what to do. That’s what this guide is for.
Wine Making Basics is your starting point for everything you need to know before — and during — your first batch: the equipment you actually need (not the upsell list), how fermentation works, how to avoid the mistakes that ruin most beginner batches, and how to finish and bottle wine you’ll actually want to drink.
If you’re brand new, read this guide top to bottom. If you already have a batch going and just need to fix a specific problem, use the Quick Navigation section below to jump straight to the guide you need.
What Is Home Wine Making?
At its core, wine making is simple: yeast eats the natural sugar in fruit juice and converts it into alcohol and carbon dioxide. That’s fermentation. Everything else — sanitizing your equipment, choosing the right yeast, monitoring sugar levels with a hydrometer, clarifying and bottling — exists to control that process so it produces something you want to drink instead of something that tastes like vinegar.
People make wine at home for a few reasons: it’s cheaper per bottle than store-bought wine over time, you control exactly what goes into it, and — honestly — there’s a real sense of satisfaction in pouring a glass of something you grew, fermented, and bottled yourself. It’s also a genuinely approachable hobby. You don’t need a vineyard or a chemistry degree, just patience and attention to a few key details.
This page covers the process of making wine. If you’re looking for a specific recipe (strawberry, mulled wine, dandelion, and more), head to Fruit Wine Recipes or Mulled Wine instead.
Quick Navigation: Wine Making Basics Guides
Measuring & Monitoring Fermentation
- How to Read a Hydrometer — measure sugar content before and during fermentation so you always know where your batch stands, plus a built-in calculator.
Troubleshooting
- Solving the Most Common Problems in Home Winemaking — diagnose stuck fermentation, off-flavors, cloudiness, and the other issues that trip up beginners most often.
Finishing & Clarity
- Wine Clarification Methods — the methods that take your wine from cloudy to clear and bright before it goes in the bottle.
Bottling & Equipment Care
- How to Select a Cork For Wine Bottles — match your cork choice to how long you plan to age the bottle.
- How to Clean a Carboy — the 5-step process I use to sanitize fermenters between batches without leaving residue.
- Removing Wine Labels — reuse glass bottles cleanly for your own batches.
More beginner guides — including a full equipment list, yeast selection guide, and batch-size planning — are in progress and will be added here as they’re published.
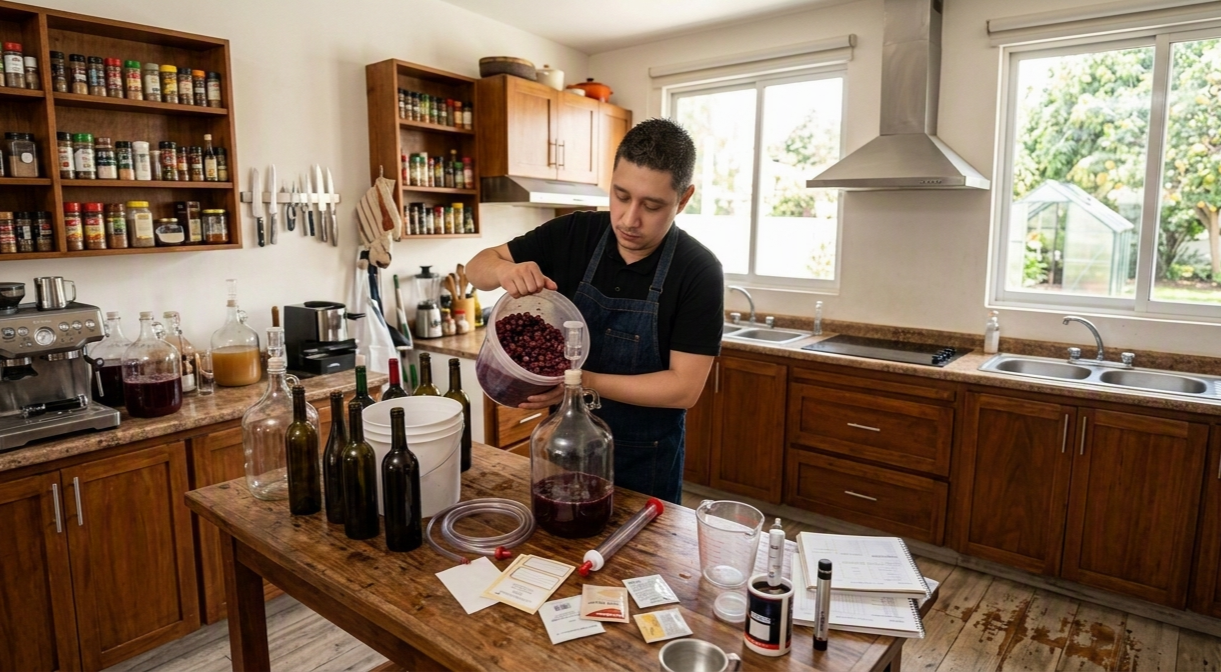
Getting Started: Essential Equipment for Beginners
You don’t need to buy everything at once, but a basic starter kit makes the difference between a batch that ferments cleanly and one that struggles. For a 1-gallon starter batch you’ll need:
- A fermenter — a food-grade plastic bucket or glass carboy with an airtight lid
- An airlock — lets CO₂ escape during fermentation without letting air (and contaminants) in
- A hydrometer — measures sugar content so you can track fermentation progress and estimate final alcohol content
- A sanitizer (like Star San or a no-rinse equivalent) — non-negotiable; most beginner batches that go wrong are a sanitation problem, not a recipe problem
- A siphon or racking cane — moves wine between vessels without disturbing the sediment at the bottom
- Wine bottles and corks (or screw caps) — for the finished product
- A corker — if you’re using corks instead of screw caps
If you’re scaling up to a 5-gallon batch, you’ll need proportionally larger versions of the same equipment — the process itself doesn’t change, just the volumes.
How Fermentation Works: A Beginner’s Primer
Fermentation happens in roughly three stages. First, you combine your fruit, sugar (if needed), water, and wine yeast — this is your “must.” Second, primary fermentation kicks in: the yeast actively converts sugar to alcohol, which is the vigorous, bubbly stage you’ll see in the first 1–2 weeks. Third, secondary fermentation is slower and quieter, as the yeast finishes converting the remaining sugar and the wine begins to clear.
The single most useful tool for understanding where you are in this process is a hydrometer. It measures specific gravity (SG) — essentially, how much sugar is still dissolved in your must. A starting SG around 1.090–1.100 is typical for table wine; as fermentation progresses, that number drops. When it stabilizes near 0.990–0.998 over a few consecutive days, fermentation is likely complete. For the full step-by-step on taking and reading these measurements, see How to Read a Hydrometer.
Common Mistakes and How to Avoid Them
In my experience, almost every “my wine went wrong” question traces back to one of these:
- Skipping or rushing sanitation — wild bacteria and yeast will outcompete your wine yeast if your equipment isn’t properly sanitized.
- Fermenting at the wrong temperature — too cold and fermentation stalls; too hot and you get harsh, off flavors.
- Bottling too early — if fermentation isn’t actually finished, bottles can build dangerous pressure.
- Ignoring a stuck fermentation — a stalled SG reading usually has a fixable cause (temperature, nutrient deficiency, yeast health), but only if you catch it early.
- Not taking SG readings at all — without a hydrometer, you’re guessing at when your wine is actually done.
For a full troubleshooting table covering these and more, see Solving the Most Common Problems in Home Winemaking.
Bottling, Corking, and Finishing Your Wine
Once fermentation is complete and your wine has cleared, it’s ready to bottle. This is also where a lot of beginners under-think their choices — the cork you pick affects how long your wine can age, and if you’re reusing bottles, getting old labels off cleanly matters more than it seems.
- How to Select a Cork For Wine Bottles walks through natural vs. synthetic vs. agglomerated corks and how long each is rated to last.
- Removing Wine Labels covers the step-by-step process for prepping reused bottles without damaging them.
Equipment Care and Sanitation
Clean equipment is the difference between a batch that tastes the way you intended and one that doesn’t. Two guides cover this in depth:
- How to Clean a Carboy — my 5-step process for getting residue out of glass and plastic carboys safely (and why you should avoid bleach-based cleaners).
- Wine Clarification Methods — once your wine is fermented, these are the methods to get it bright and clear before bottling.
Beginner Tips for Your First Batch
- Start small. A 1-gallon batch is cheaper to experiment with and easier to manage than jumping straight to 5 gallons.
- Write everything down. Starting SG, dates, temperatures — you’ll thank yourself when you want to repeat (or fix) a batch.
- Be patient. Most beginner mistakes come from rushing — racking too soon, bottling too soon, or giving up on a slow fermentation too early.
- Taste as you go, but don’t panic at how “off” young wine tastes — it changes significantly as it clears and ages.
- When in doubt, sanitize again. It’s never the reason your batch failed to over-sanitize.
About Carlos’s Wine Making Experience
I’ve been making wine at home for years, working through more failed batches than I’d like to admit before getting consistent results. I run the Winemaking for Beginners community and write every guide on this site based on what I’ve actually tested — not just what’s commonly repeated online. Read more about my background on the About page.
Frequently Asked Questions
Do I need special equipment to start making wine at home?
You need a few basics — a fermenter, airlock, hydrometer, and sanitizer — but none of it is expensive or hard to find. See the Essential Equipment section above for the full starter list.
How long does it take to make wine from start to finish?
Most batches take 4–8 weeks from start to bottling, though aging afterward can improve the result further. Timing depends on your recipe, yeast, and temperature.
Why is my fermentation not starting, or why has it stalled?
This is almost always a temperature, yeast health, or nutrient issue. See Solving the Most Common Problems in Home Winemaking for the full troubleshooting breakdown.
How do I know when my wine is ready to bottle?
When your hydrometer shows a stable specific gravity over several consecutive days (typically 0.990–0.998) and the wine has cleared, it’s ready. See How to Read a Hydrometer.
Can I make wine without a hydrometer?
You can, but you’ll be guessing at when fermentation is actually finished, which increases the risk of bottling too early. A hydrometer is the single most useful tool for a beginner.
How do I sanitize my equipment properly?
Use a dedicated wine/beer-safe sanitizer — never bleach or regular dish soap. See How to Clean a Carboy for the full step-by-step process.
What’s the most common mistake beginners make?
Skipping or rushing sanitation. It’s responsible for more ruined batches than any recipe mistake.
By Carlos Ocampo — homebrewer and founder of MakeWineLab, sharing what years of trial, error, and successful batches have taught him about making wine at home.